
Now let us return to a time when three alignments were enough, when a handful of character classes ruled, and when magic swords had their own ideas about who's boss.
INTRODUCING OUR UNDERNAUTS
- Orgatto Snook, Esquire the 1st (M-U)
- Officer Belamere (Fighter)
- Esclamonde (Elf) Morpho-Synth
- Slurm the Sullied (Thief)
- Louise the Lush (Cleric)
DUNGEON OF THE COCKLE-MOCKER is the SIXTH official dungeon for our campaign.
This is my modified version of the Delving Deeper Tarrent & Nogrod Dungeon freely available here: If you are not familiar with Delving Deeper, it is a wonderful OD&D clone, & I cannot recommend it highly enough. Find the rules here:
Note: I like working with simple frameworks. I don’t need backgrounds spanning centuries leading up to the adventure. Just give me some flavour, just enough to fire up the ol’ imagination, a map, and I will let my imagination squirt out the rest for better or worse.
In particular the following led to some highlights of the dungeon.
- Cocklemocker. A former Undernaut of high repute.
- Jitterhex; an un-awakened enchanted broadsword of immense power.
- Helm of alignment change
- Robo Dreamwise ~ The Robot Butler
-------------------------------------------------------------
Lets make running this dungeon simple. Grab OD&D (3LBB’s) or your clone of choice and have at it! For my games I use the following:
-------------------------------------------------------------
- d6 HD
- d6 Damage
- Every 1 gp spent = 1xp
- 100xp per monster HD
- Oh yeah encumbrance & lighting matters. No infravision for PC’s
-------------------------------------------------------------
BACKGROUND
Cassandra Company has received word that two rebel Thaumaturgists, now anti-clerics (once in the Companies employ) have been conducting highly illegal & forbidden experiments on living subjects. Experiments they were dismissed from service for.
But whats more concerning is that they have in their possession an ancient sword forged in the days of the Brass Gods.A sword believed to have been the very key to the Brass Gods destruction. The two rebel Clerics stole and fled with the sword before Cassandra Company could hand them over for arrest and sentencing.
You are tasked with capturing, or slaying the Black Friars, Tarrant & Nogrod, and retrieving the Enchanted Blade known as Jitterhex; an as of yet un-awakened large broadsword able to alter its size and power based on its wielder.

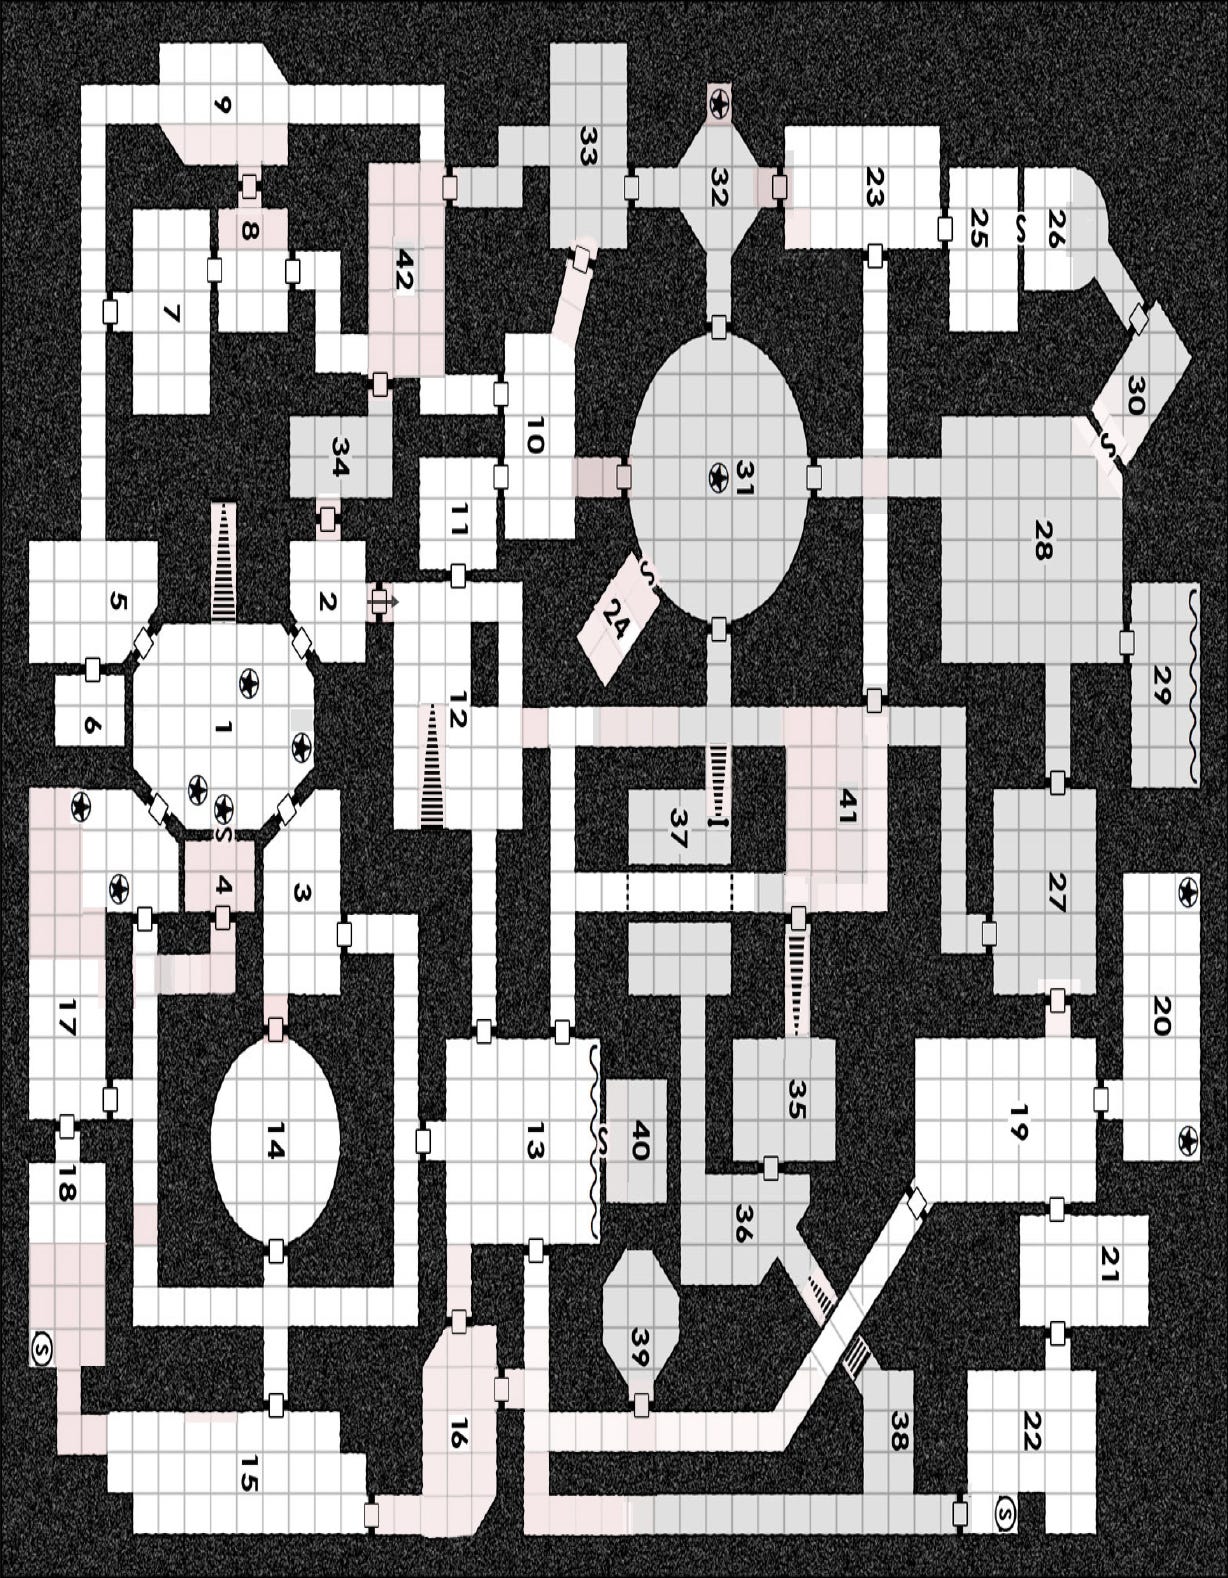
KEYED AREAS
NOTE: Players will first enter the dungeon at ROOM #12.
[1] TREASURE+MONSTER A foul(!) Cocklemocker [AC 6 MV 9/18 HD 5 C] has crept up from the lower levels and petrified several bandits who dared come this way. Spilling from split sacks around the perimeter are 1,800sp and 800gp. However, five pieces of jewelry can be prised from the statues–and the monstrous guardian–worth 400gp, 1,000gp, 2,700gp, 2,100gp, and 2,000gp, respectively. The stair descends to a lower level.
[2] EMPTY ROOM The northern door is a one-way turnstile; it can be used to pass from here into room #12, but it does not permit egress from #12 into this room.
[3] EMPTY ROOM A sparse room with nothing to offer beyond a faint scent of limestone.
[4] EMPTY ROOM A closed room. There is a secret peep hole through which a (partially obstructed) view of room #1 can be had without any risk of being petrified by the Cocklemocker.
[5] MONSTER 2-8 giant leeches [AC 8 MV 3/6 HD 2 N] persist in this damp chamber. They are initially clinging to the ceiling, dropping down onto any who do not look up as they enter.
[6] EMPTY ROOM A small, dark room with drips falling infrequently from the ceiling and an 12 inches of standing murky water on the ground.
[7] EMPTY ROOM A modestly clean and comfortable room. The north door has not been opened in ages.
[8] EMPTY ROOM Mabyagzeurg (see room #9) has laid a host of eggs here, which cling to the floor and walls via her webs. The door to #9 is open and so choked with silk as to be a web funnel.
[9] TREASURE+MONSTER Mabyagzeurg, a terrible giant spider [AC 5 MV 3/12 HD 4+4 C], lurks here amid a pitch dark tangle of lines and webs of sticky silk. She will wait for the players to make a route through her lair, striking only at the last figure. Her treasure is 1200sp and 1000gp scattered throughout the room. The door to #8 is open and so choked with webs as to be a web funnel.
[10] EMPTY ROOM A perfectly plain room. The western door is cool to touch.
[11] EMPTY ROOM A curious room in which the floor is painted yellow.
[12] EMPTY ROOM Players first enter this dungeon level here. The stair here ascends to the upper world. The southern door is a one-way turnstile; it can only be used to enter this room from #2; it does not permit egress into #2.
[13] TREASURE+MONSTER 2-12 callous rival adventurers (brigands) [AC 7 MV 12 HD 1 C] are here despite half the group recently making off with most of the treasure. The brigands are fiercely upset about the mutiny and are plotting a counter move. Their remaining loot is hidden in a secret room #40 behind a tapestry, accessible via a removable wooden panel.
[14] EMPTY ROOM An echo chamber. Every sound seems nearer and clearer here. A figure standing silently and listening here can–each on a successful listen at doors throw–hear the Cocklemocker clucking in #1, the rats twittering in #17, the bandits whispering in #15, and the brigands muttering in #13.
[15] MONSTER 2-12 Bandits [AC 7 MV 12 HD 1 N] have broken away from the main group of rival advenurers (brigands #13) to hole up here. They suspect the brigands (see #13) will move against them soon, so they have hidden their treasure in room #18. They know there is something terrible in room #1.
[16] TRICK/TRAP Two dozen battered old shields and helms, broken pieces of armour, and yellowed skulls dangle from chains, filling the room with potential alarm bells. Should anyone–or even so much as a decent breeze–move through here, they will make a clatter, forewarning the bandits at #15 and the brigands at #13.
[17] MONSTER There are several rat-statues here, petrified by the Cocklemocker (see room #1). 2-12 live giant rats [AC 7 MV 12/6 HD 1/2 N] abide amongst the rubbish, mainly at the eastern end of the room.
[18] TREASURE The bandits (see #15) have buried 1,800sp and 600gp in small sacks beneath a couple of loose flagstones in the south-east corner of this room.
[19] MONSTER 2-12 beastmen [AC 7 MV 9 HD 1 C] are stationed here, maintaining an uneasy truce with both the anti-clerics (see #36) and the Wizard’s mercenaries (see #28). The beastmen barrack in room #20.
[20] EMPTY ROOM The beastmen stationed in #19 and #22 barrack here.
[21] EMPTY ROOM The beastmens larder. Barrels of sour wine, rough ale, and drying flesh. Sides of mutton, bins of weevily black bread, and wheels of hard mouldy cheese.
[22] TREASURE+MONSTER 2-8 giant beastmen [AC 6 MV 9 HD 2 C] are stationed here, holding the south passage against any intruders. Gorok (3 HD) carries Jitterhex; an an un-awakened enchanted broadsword +1, +2 vs brass & men. The beastmen's treasure comprises 1500sp and is hidden in a locked chest buried below the flagstones (marked S on the map). Gorok has the key.
[23] TREASURE+MONSTER 2-12 greedy dwarfs [AC 4 MV 6 HD 1 N] are here, counting out the silver they have won from Amedeo’s mercenaries (see #28) and scheming on how they will get more silver out of the wizard himself (see #25). Duffr, the eldest and wisest amongst them, is under Amedeo’s charm and councils the dwarfs accordingly. All told the dwarfs have accumulated 2,000sp.
[24] TREASURE The door to this secret treasury can only be opened by making the statue in room #31 point in a south of south-east direction. The door will snap closed as soon as nobody remains in room #31. If all the players are in this room when this occurs, they will be trapped here. There is a desiccated corpse of a would-be-adventurer who starved in similar circumstances, and the small chest and three sacks he up-ended and spilled in his frustration. All told there are 800gp and 1,600sp scattered about.
[25] MONSTER Quarters for a gentleman of modest means comprising a four-poster bed with mosquito net, a foot locker containing a change of clothes, a vanity, and a night stand. The whole is illuminated by a broad candelabra and is kept spotlessly tidy. A secret door behind the vanity’s mirror accesses room #26.
Amedeo Rusfusstus [AC 9 MV 12 HD 3 C], a 4th level Magic-User, resides here but chooses to keep this room plain. He carries a Wand of Detecting Magic and wears a Cloak of Shadows (as per a Cloak of Elvenkind but with more sinister lineage). He is attended by an impeccably shiny sentient-robot butler, Robo Dreamwise [AC 9 MV 9 HD 1 N] (with a loyalty of 11) and has charms upon Gorok the giant beastman (room #22) and Duffr the elder dwarf (room #23). The mercenaries in room #28 are in his employ (with a loyalty of 15). Amedeo carries the key to room #30 on a chain about his neck.
[26] TREASURE Amedeo’s study contains a comfortable arm chair and a wall to wall bookshelf which is mostly occupied by obscure samples, glass wear, writing implements, and loose notes and scrolls. Theses are Amedeo’s studies. His books of First- and Second-Level Occult Magic-Users Spells are also present; indistinguishable from a dozen other less important tomes.
[27] EMPTY ROOM A crude parley table stands in the middle of this bare room. Battered shields and arms decorate the easterly and westerly entrances. The beastmen (see rooms #19 and #22) infrequently use this room to negotiate with Amedeo or his servants (see rooms #25 and #28).
[28] MONSTER 2-8 mercenary fighters [AC 4 MV 9 HD 1+1 N] reside here. They are employed by Amedeo Rusfusstus (see room #25). He pays well so their loyalty rating is very high (15). However, they love to gamble and have recently lost most of their silver (again!) to the despicable dwarfs (see room #23) who they are convinced must be cheats. They do not know about rooms #26 or #30, nor about the secret peep hole through which Amedeo occasionally spies upon them.
[29] EMPTY ROOM The mercenaries stationed in room #28 barrack here.
[30] TREASURE The door to Amedeo’s treasury is locked (see room #25). Inside is his dangerously depleted hoard which comprises a mere 2500sp in two small chests and several loose sacks. Several empty boxes imply there was more loot here previously. Amedeo has indeed spent much of his money on his research and retainers, and is well aware that he is in need of additional funds. There is a secret peep hole here that looks into room #28.
[31] TRICK/TRAP There are two mechanical truths to observe here:
1) Only one of room #31’s portals can be opened at any time, and
2) While anyone is inside room #31 no portal can be opened from the outside.
From the outside the four portals appear to be diagonally bisected brass plate doors which automatically snap open (Deathstar-esque), and remain open while anyone is within 20ft of the exterior threshold. The portal will automatically snap shut as soon as nobody remains within a 20ft approach of the exterior threshold.
Should they become separated with some inside and some outside, those players outside must not overhear what happens inside the room!
The statue in the centre of the room will always be pointing imperiously toward the door the players entered by. Only after the door has shut can the statue’s upper torso be twisted (with great labour) so that it points to another door, which then snaps open and remains so while there is anybody in room #31. A dwarf working the statue may perceive a nick in the mechanism when passing through south of south-east. If the statue is set pointing in this direction, the secret door to room #24 will snap open (obeying the same mechanical truths as the other portals).
[32] EMPTY ROOM A disused shrine, overlooked by a statue of a forgotten Brass Crab Demon/God. The southern door is cool to touch.
[33] EMPTY ROOM This room is unusually cold & silent. Brass Spiders will not enter or pursue through this room.
[34] MONSTER Two ancient green slimes [AC 9 MV — HD 3 N] are slowly conjoining into something new, in this narrow room.
[35] MONSTER Both doors are locked. Tarrent and Nogrod (see #36) each have a key that fits both doors. Forcing the western door from room #41 will likely result in a tumble down the stair.
The room is pitch dark and cool. 2-8 ghouls [AC 7 MV 9 HD 2 C] are kept locked in here, to be subjected to the experiments of the Black Friars; Tarrent and Nogrod (see room #36). They will surge to attack any who enter.
[36] TREASURE+MONSTER Tarrent [AC 7 MV 12 HD 2+1 C] and Nogrod [AC 9 MV 12 HD 2+1 C], two 3rd level Anti-clerics, conduct their blasphemous inquiries in this Frankenstein’s body shop. They are accompanied by 2-8 fanatic cultists [AC 9 MV 12 HD 1+1 C].
The Anti-clerics hope to acquire a ghoul’s power of paralysis (thus the captives in room #35) for their own evil ends. A dissected specimen lies upon a grisly slab. Tarrent carries a magical shield +1, Nogrod wears a helm of alignment change. Additionally, there are a score of small brass pots filled with silver coins; collectively they contain 1,900sp.
Tarrent’s book of First Level Thaumaturgical (Clerical) Spells is here but Nogrod does not yet possess one; he must share that of his evil Brother.
[37] EMPTY ROOM A blasphemers’ shrine, situated below an arched footbridge. Tarrent, Nogrod, and their cult (see #36) have cots here. Tarrent’s book of First Level Clerical Spells is hidden, face down, under his cot.
[38] EMPTY ROOM Blasphemous runes and signs are painted on the walls here. A stair descends to room #36, passing below the passageway south-east of room #19.
[39] TRICK/TRAP The door to this room is apparently locked, but it will give way rather easily. Inside is a small room with every indication of a treasury; Reaching into the room from each of the five walls facing the door is a large stone forearm proffering a sparking gem. Below these, the floor is stacked with pots of gold and sacks of silver.
All told the players will estimate 10,000 coins with 3,000-8,000gp and the balance sp. It is all an illusionary trick, of course. The gems and coins are in fact worthless, gray-white pebbles which will only encumber the players. The illusion will reset an hour after being looted.
[40] TREASURE A quiet, secret chamber of wood panelled walls. The rival adventurers (brigands) at #13 have hidden their loot in a small chest in the middle of the room. It contains 800sp and 800gp. Curiously, there is a pile of gray-white pebbles–just as large–adjacent to the chest.
[41] EMPTY ROOM A strangely bare intersection. The eastern door is always locked. Tarrent and Nogrod (see #36) each have a key. Forcing the door will likely result in a tumble down the stair immediately inside and into room #35.
[42] MONSTER 2-12 large brass spiders [AC 8 MV 6/15 HD 1/2 N] are here. Although these are Mabyagzeurg’s (see room #9) most recent batch of offspring, she is absolutely indifferent to them. As far as she is concerned, they are food.
NOTES:
Number of Monsters Appearing
The numbers of monsters appearing presumes 4-6 players. Use one-half as many monsters for a group of 2-3 players, or half as many again for a group of 7-10 players.
Use of Enchanted Weapons
In room #22 Gorok carries Jitterhex; a sword +1, +2 vs brass & men.
NOTE: Players will first enter the dungeon at ROOM #12.
[1] TREASURE+MONSTER A foul(!) Cocklemocker [AC 6 MV 9/18 HD 5 C] has crept up from the lower levels and petrified several bandits who dared come this way. Spilling from split sacks around the perimeter are 1,800sp and 800gp. However, five pieces of jewelry can be prised from the statues–and the monstrous guardian–worth 400gp, 1,000gp, 2,700gp, 2,100gp, and 2,000gp, respectively. The stair descends to a lower level.
[2] EMPTY ROOM The northern door is a one-way turnstile; it can be used to pass from here into room #12, but it does not permit egress from #12 into this room.
[3] EMPTY ROOM A sparse room with nothing to offer beyond a faint scent of limestone.
[4] EMPTY ROOM A closed room. There is a secret peep hole through which a (partially obstructed) view of room #1 can be had without any risk of being petrified by the Cocklemocker.
[5] MONSTER 2-8 giant leeches [AC 8 MV 3/6 HD 2 N] persist in this damp chamber. They are initially clinging to the ceiling, dropping down onto any who do not look up as they enter.
[6] EMPTY ROOM A small, dark room with drips falling infrequently from the ceiling and an 12 inches of standing murky water on the ground.
[7] EMPTY ROOM A modestly clean and comfortable room. The north door has not been opened in ages.
[8] EMPTY ROOM Mabyagzeurg (see room #9) has laid a host of eggs here, which cling to the floor and walls via her webs. The door to #9 is open and so choked with silk as to be a web funnel.
[9] TREASURE+MONSTER Mabyagzeurg, a terrible giant spider [AC 5 MV 3/12 HD 4+4 C], lurks here amid a pitch dark tangle of lines and webs of sticky silk. She will wait for the players to make a route through her lair, striking only at the last figure. Her treasure is 1200sp and 1000gp scattered throughout the room. The door to #8 is open and so choked with webs as to be a web funnel.
[10] EMPTY ROOM A perfectly plain room. The western door is cool to touch.
[11] EMPTY ROOM A curious room in which the floor is painted yellow.
[12] EMPTY ROOM Players first enter this dungeon level here. The stair here ascends to the upper world. The southern door is a one-way turnstile; it can only be used to enter this room from #2; it does not permit egress into #2.
[13] TREASURE+MONSTER 2-12 callous rival adventurers (brigands) [AC 7 MV 12 HD 1 C] are here despite half the group recently making off with most of the treasure. The brigands are fiercely upset about the mutiny and are plotting a counter move. Their remaining loot is hidden in a secret room #40 behind a tapestry, accessible via a removable wooden panel.
[14] EMPTY ROOM An echo chamber. Every sound seems nearer and clearer here. A figure standing silently and listening here can–each on a successful listen at doors throw–hear the Cocklemocker clucking in #1, the rats twittering in #17, the bandits whispering in #15, and the brigands muttering in #13.
[15] MONSTER 2-12 Bandits [AC 7 MV 12 HD 1 N] have broken away from the main group of rival advenurers (brigands #13) to hole up here. They suspect the brigands (see #13) will move against them soon, so they have hidden their treasure in room #18. They know there is something terrible in room #1.
[16] TRICK/TRAP Two dozen battered old shields and helms, broken pieces of armour, and yellowed skulls dangle from chains, filling the room with potential alarm bells. Should anyone–or even so much as a decent breeze–move through here, they will make a clatter, forewarning the bandits at #15 and the brigands at #13.
[17] MONSTER There are several rat-statues here, petrified by the Cocklemocker (see room #1). 2-12 live giant rats [AC 7 MV 12/6 HD 1/2 N] abide amongst the rubbish, mainly at the eastern end of the room.
[18] TREASURE The bandits (see #15) have buried 1,800sp and 600gp in small sacks beneath a couple of loose flagstones in the south-east corner of this room.
[19] MONSTER 2-12 beastmen [AC 7 MV 9 HD 1 C] are stationed here, maintaining an uneasy truce with both the anti-clerics (see #36) and the Wizard’s mercenaries (see #28). The beastmen barrack in room #20.
[20] EMPTY ROOM The beastmen stationed in #19 and #22 barrack here.
[21] EMPTY ROOM The beastmens larder. Barrels of sour wine, rough ale, and drying flesh. Sides of mutton, bins of weevily black bread, and wheels of hard mouldy cheese.

[22] TREASURE+MONSTER 2-8 giant beastmen [AC 6 MV 9 HD 2 C] are stationed here, holding the south passage against any intruders. Gorok (3 HD) carries Jitterhex; an an un-awakened enchanted broadsword +1, +2 vs brass & men. The beastmen's treasure comprises 1500sp and is hidden in a locked chest buried below the flagstones (marked S on the map). Gorok has the key.
[23] TREASURE+MONSTER 2-12 greedy dwarfs [AC 4 MV 6 HD 1 N] are here, counting out the silver they have won from Amedeo’s mercenaries (see #28) and scheming on how they will get more silver out of the wizard himself (see #25). Duffr, the eldest and wisest amongst them, is under Amedeo’s charm and councils the dwarfs accordingly. All told the dwarfs have accumulated 2,000sp.
[24] TREASURE The door to this secret treasury can only be opened by making the statue in room #31 point in a south of south-east direction. The door will snap closed as soon as nobody remains in room #31. If all the players are in this room when this occurs, they will be trapped here. There is a desiccated corpse of a would-be-adventurer who starved in similar circumstances, and the small chest and three sacks he up-ended and spilled in his frustration. All told there are 800gp and 1,600sp scattered about.
[25] MONSTER Quarters for a gentleman of modest means comprising a four-poster bed with mosquito net, a foot locker containing a change of clothes, a vanity, and a night stand. The whole is illuminated by a broad candelabra and is kept spotlessly tidy. A secret door behind the vanity’s mirror accesses room #26.
Amedeo Rusfusstus [AC 9 MV 12 HD 3 C], a 4th level Magic-User, resides here but chooses to keep this room plain. He carries a Wand of Detecting Magic and wears a Cloak of Shadows (as per a Cloak of Elvenkind but with more sinister lineage). He is attended by an impeccably shiny sentient-robot butler, Robo Dreamwise [AC 9 MV 9 HD 1 N] (with a loyalty of 11) and has charms upon Gorok the giant beastman (room #22) and Duffr the elder dwarf (room #23). The mercenaries in room #28 are in his employ (with a loyalty of 15). Amedeo carries the key to room #30 on a chain about his neck.
[26] TREASURE Amedeo’s study contains a comfortable arm chair and a wall to wall bookshelf which is mostly occupied by obscure samples, glass wear, writing implements, and loose notes and scrolls. Theses are Amedeo’s studies. His books of First- and Second-Level Occult Magic-Users Spells are also present; indistinguishable from a dozen other less important tomes.
[27] EMPTY ROOM A crude parley table stands in the middle of this bare room. Battered shields and arms decorate the easterly and westerly entrances. The beastmen (see rooms #19 and #22) infrequently use this room to negotiate with Amedeo or his servants (see rooms #25 and #28).
[28] MONSTER 2-8 mercenary fighters [AC 4 MV 9 HD 1+1 N] reside here. They are employed by Amedeo Rusfusstus (see room #25). He pays well so their loyalty rating is very high (15). However, they love to gamble and have recently lost most of their silver (again!) to the despicable dwarfs (see room #23) who they are convinced must be cheats. They do not know about rooms #26 or #30, nor about the secret peep hole through which Amedeo occasionally spies upon them.
[29] EMPTY ROOM The mercenaries stationed in room #28 barrack here.
[30] TREASURE The door to Amedeo’s treasury is locked (see room #25). Inside is his dangerously depleted hoard which comprises a mere 2500sp in two small chests and several loose sacks. Several empty boxes imply there was more loot here previously. Amedeo has indeed spent much of his money on his research and retainers, and is well aware that he is in need of additional funds. There is a secret peep hole here that looks into room #28.
[31] TRICK/TRAP There are two mechanical truths to observe here:
1) Only one of room #31’s portals can be opened at any time, and
2) While anyone is inside room #31 no portal can be opened from the outside.
From the outside the four portals appear to be diagonally bisected brass plate doors which automatically snap open (Deathstar-esque), and remain open while anyone is within 20ft of the exterior threshold. The portal will automatically snap shut as soon as nobody remains within a 20ft approach of the exterior threshold.
Should they become separated with some inside and some outside, those players outside must not overhear what happens inside the room!
The statue in the centre of the room will always be pointing imperiously toward the door the players entered by. Only after the door has shut can the statue’s upper torso be twisted (with great labour) so that it points to another door, which then snaps open and remains so while there is anybody in room #31. A dwarf working the statue may perceive a nick in the mechanism when passing through south of south-east. If the statue is set pointing in this direction, the secret door to room #24 will snap open (obeying the same mechanical truths as the other portals).
[32] EMPTY ROOM A disused shrine, overlooked by a statue of a forgotten Brass Crab Demon/God. The southern door is cool to touch.
[33] EMPTY ROOM This room is unusually cold & silent. Brass Spiders will not enter or pursue through this room.
[34] MONSTER Two ancient green slimes [AC 9 MV — HD 3 N] are slowly conjoining into something new, in this narrow room.
[35] MONSTER Both doors are locked. Tarrent and Nogrod (see #36) each have a key that fits both doors. Forcing the western door from room #41 will likely result in a tumble down the stair.
The room is pitch dark and cool. 2-8 ghouls [AC 7 MV 9 HD 2 C] are kept locked in here, to be subjected to the experiments of the Black Friars; Tarrent and Nogrod (see room #36). They will surge to attack any who enter.
[36] TREASURE+MONSTER Tarrent [AC 7 MV 12 HD 2+1 C] and Nogrod [AC 9 MV 12 HD 2+1 C], two 3rd level Anti-clerics, conduct their blasphemous inquiries in this Frankenstein’s body shop. They are accompanied by 2-8 fanatic cultists [AC 9 MV 12 HD 1+1 C].
The Anti-clerics hope to acquire a ghoul’s power of paralysis (thus the captives in room #35) for their own evil ends. A dissected specimen lies upon a grisly slab. Tarrent carries a magical shield +1, Nogrod wears a helm of alignment change. Additionally, there are a score of small brass pots filled with silver coins; collectively they contain 1,900sp.
Tarrent’s book of First Level Thaumaturgical (Clerical) Spells is here but Nogrod does not yet possess one; he must share that of his evil Brother.
[37] EMPTY ROOM A blasphemers’ shrine, situated below an arched footbridge. Tarrent, Nogrod, and their cult (see #36) have cots here. Tarrent’s book of First Level Clerical Spells is hidden, face down, under his cot.
[38] EMPTY ROOM Blasphemous runes and signs are painted on the walls here. A stair descends to room #36, passing below the passageway south-east of room #19.
[39] TRICK/TRAP The door to this room is apparently locked, but it will give way rather easily. Inside is a small room with every indication of a treasury; Reaching into the room from each of the five walls facing the door is a large stone forearm proffering a sparking gem. Below these, the floor is stacked with pots of gold and sacks of silver.
All told the players will estimate 10,000 coins with 3,000-8,000gp and the balance sp. It is all an illusionary trick, of course. The gems and coins are in fact worthless, gray-white pebbles which will only encumber the players. The illusion will reset an hour after being looted.
[40] TREASURE A quiet, secret chamber of wood panelled walls. The rival adventurers (brigands) at #13 have hidden their loot in a small chest in the middle of the room. It contains 800sp and 800gp. Curiously, there is a pile of gray-white pebbles–just as large–adjacent to the chest.
[41] EMPTY ROOM A strangely bare intersection. The eastern door is always locked. Tarrent and Nogrod (see #36) each have a key. Forcing the door will likely result in a tumble down the stair immediately inside and into room #35.
[42] MONSTER 2-12 large brass spiders [AC 8 MV 6/15 HD 1/2 N] are here. Although these are Mabyagzeurg’s (see room #9) most recent batch of offspring, she is absolutely indifferent to them. As far as she is concerned, they are food.
NOTES:
Number of Monsters Appearing
The numbers of monsters appearing presumes 4-6 players. Use one-half as many monsters for a group of 2-3 players, or half as many again for a group of 7-10 players.
Use of Enchanted Weapons
In room #22 Gorok carries Jitterhex; a sword +1, +2 vs brass & men.


No comments:
Post a Comment